SpringFramework框架-IOC IOC(控制反转)是一种设计思想,它将传统程序中由开发者主动创建和管理对象的控制权反转给外部容器。在这种模式下,程序不再通过new关键字直接实例化对象,而是由容器负责对象的生命周期管理、依赖注入和配置组装
Bean对象的实例化 在Spring框架中,类的生命周期由Spring容器管理,是普通Java类的实例,这种机制的底层是通过反射获取类并新建实例化的。一般有三种方法用于获取实例对象
构造器实例化 先创建一个类
public class TestBean { public void test () { System.out.println("function of TestBean is invoked..." ); } }
在resource目录下新建XML配置文件,这里取名spring.xml容器会通过这个文件解析类对象
<?xml version="1.0" encoding="UTF-8" ?> <beans xmlns ="http://www.springframework.org/schema/beans" xmlns:xsi ="http://www.w3.org/2001/XMLSchema-instance" xsi:schemaLocation ="http://www.springframework.org/schema/beans https://www.springframework.org/schema/beans/spring-beans.xsd" > <bean id ="testBean" class ="Beans.TestBean" > </bean > </beans >
id属性是辨识该bean的唯一标识,class属性指向该类的class路径,此外<bean>标签下还可以定义很多子标签,但目前暂不涉及。
接下来测试使用Spring获取一个实例化对象,需要实例化一个ClassPathXmlApplicationContext类并传入xml文件名用以解析,之后就可通过getBean()方法获取实例,并能正常调用该实例的方法
public class Test { static void main () { ApplicationContext context = new ClassPathXmlApplicationContext ("spring.xml" ); TestBean testBean = (TestBean) context.getBean("testBean" ); testBean.test(); } }
静态工厂实例化 写一个TestBean2
public class TestBean2 { public void Test () { System.out.println("TestBean2 test" ); } }
再写一个StaticFactory用来执行构造方法
public class StaticFactory { public static TestBean2 getTestBean2 () { return new TestBean2 (); } }
写配置文件时,class属性需要指向StaticFactory类,并添加factory-method属性,指向TestBean2的构造方法
<?xml version="1.0" encoding="UTF-8" ?> <beans xmlns="http://www.springframework.org/schema/beans" xmlns:xsi="http://www.w3.org/2001/XMLSchema-instance" xsi:schemaLocation="http://www.springframework.org/schema/beans https://www.springframework.org/schema/beans/spring-beans.xsd" > <bean id="testBean2" class="Factory.StaticFactory" factory-method="getTestBean2" > <!-- collaborators and configuration for this bean go here --> </bean> </beans>
测试程序如下,能够正常获取实例对象并调用相应方法
public class Test { static void main () { ApplicationContext context = new ClassPathXmlApplicationContext ("spring.xml" ); TestBean2 testBean2 = (TestBean2) context.getBean("testBean2" ); testBean2.Test(); } }
除了静态工厂实例化还有一个实例工厂实例化,不同点在于实例工厂的构造方法不是静态方法,这种构造方法要单独为工厂和目标类写配置文件,本质是先实例化工厂再调用构造方法
<?xml version="1.0" encoding="UTF-8" ?> <beans xmlns ="http://www.springframework.org/schema/beans" xmlns:xsi ="http://www.w3.org/2001/XMLSchema-instance" xsi:schemaLocation ="http://www.springframework.org/schema/beans https://www.springframework.org/schema/beans/spring-beans.xsd" > <bean id ="InstanceFactory" class ="Factory.InstanceFactory" /> <bean id ="testBean2" factory-bean ="InstanceFactory" factory-method ="getTestBean2" > </bean > </beans >
IOC创建的实例化对象是单例,获取的同类对象都是一个对象,因此运行下面的程序会打印true,并且由于这种构造方式只能调用空构造器,这要求目标类的空构造方法必须存在
public class Test { static void main () { ApplicationContext context = new ClassPathXmlApplicationContext ("spring.xml" ); TestBean testBean = (TestBean) context.getBean("testBean" ); TestBean testBean2 = (TestBean) context.getBean("testBean" ); System.out.println(testBean2==testBean); } }
配置文件加载 配置文件中bean的class属性可以是相对路径也可以是绝对路径,对于多个配置文件主要有两种加载方法
利用可变参数加载 ClassPathXmlApplicationContext()里传递的参数可以是多个,如果想要加载多个配置文件可以直接传递多个参数,比如
ApplicationContext context = new ClassPathXmlApplicationContext ("spring1.xml" ,"spring2.xml" );
通过总配置文件加载 配置文件中可以使用impoirt加载子配置文件,后面调用ClassPathXmlApplicationContext()时只需要传递总配置文件即可,比如在spring.xml文件中
<?xml version="1.0" encoding="UTF-8" ?> <beans xmlns="http://www.springframework.org/schema/beans" xmlns:xsi="http://www.w3.org/2001/XMLSchema-instance" xsi:schemaLocation="http://www.springframework.org/schema/beans https://www.springframework.org/schema/beans/spring-beans.xsd" > <bean id="testBean" class="Beans.TestBean" > <!-- collaborators and configuration for this bean go here --> </bean> <import resource="subSpring.xml" /> </beans>
该配置文件同时包含了subSpring.xml的配置信息
手动装配(注入) 注入是指由外部容器将依赖对象自动设置到目标对象的属性或构造函数中,而不是由对象自己主动去获取,比如下面
public class TestBean { private TestBean2 testBean2; public Test (TestBean2 testBean2) { this .testBean2 = testBean2; } }
将testBean2对象集成进了TestBean类的属性testBean2,这样就不用在类的内部实例化TestBean2,而是通过外部将testBean2传进来实现对其的依赖
set注入 使用set注入实现上面的例子需要实现set()方法对testBean2进行赋值并调用其方法,如下
public class TestBean { private TestBean2 testBean2; public void test () { this .testBean2.test(); } public void setTestBean2 (TestBean2 testBean2) { this .testBean2 = testBean2; } }
但是由于没有给setTestBean2()传递参数,直接运行会爆空指针异常,这里还要改配置文件,让调用setTestBean2()时自动传入一个实例化好的TestBean2对象。需要在testBean的<bean>标签下设置<property>标签对字段进行注入
name属性指向bean对象中setter方法中指向的字段名称,ref 指向另一个bean的id,Spring会把这个Bean对象作为参数值传递过去
<?xml version="1.0" encoding="UTF-8" ?> <beans xmlns ="http://www.springframework.org/schema/beans" xmlns:xsi ="http://www.w3.org/2001/XMLSchema-instance" xsi:schemaLocation ="http://www.springframework.org/schema/beans https://www.springframework.org/schema/beans/spring-beans.xsd" > <bean id ="testBean" class ="Beans.TestBean" > <property name ="testBean2" ref ="testBean2" /> </bean > <bean id ="testBean2" class ="Beans.TestBean2" /> </beans >
使用测试程序调用testBean的test()方法成功打印TestBean2 test
public class Test { public static void main (String[] args) { ApplicationContext context = new ClassPathXmlApplicationContext ("spring.xml" ); TestBean testBean = (TestBean) context.getBean("testBean" ); testBean.test(); } }
set注入也可以为基本类型和集合类型的字段赋值,这同样需要实现setter方法,不同点在于使用value属性指向传递的参数
<bean id ="testBean" class ="Beans.TestBean" > <property name ="testBean2" ref ="testBean2" /> <property name ="name" value ="123" /> <property name ="list" > <list > <value > 123</value > <value > abc</value > </list > </property > <property name ="map" > <map > <entry value ="test01" key ="test" /> </map > </property > </bean >
构造器注入 可以为要操作的bean对象设置带参构造器,通过构造器为字段赋值,如下
public class TestBean { public TestBean2 testBean2; public TestBean (TestBean2 testBean2) { this .testBean2 = testBean2; } }
配置文件中,需要使用<constructor-arg>指向构造方法的参数名并传入值,下面的配置可以为多参构造器传递值,非bean数据类型使用value属性
<bean id ="testBean" class ="Beans.TestBean" > <constructor-arg name ="testBean2" ref ="testBean2" /> <constructor-arg name ="string" value ="asd" /> </bean > <bean id ="testBean2" class ="Beans.TestBean2" />
可以使用<index>指定传参的位置
循环依赖问题
构造器注入中,若某个bean对象需要注入另一个bean对象,需要先实例化另一个bean再传入构造器。倘若两个对象需要相互注入,会导致bean对象无法成功实例化,类似多线程的死锁问题,如下示例代码会导致循环依赖
public class TestBean { public TestBean2 testBean2; public TestBean (TestBean2 testBean2) { this .testBean2 = testBean2; } public void test () { System.out.println("test" ); } } public class TestBean2 { public TestBean testBean; public TestBean2 (TestBean testBean) { this .testBean = testBean; } } public class Test { public static void main (String[] args) { ApplicationContext context = new ClassPathXmlApplicationContext ("spring.xml" ); TestBean testBean = (TestBean) context.getBean("testBean" ); testBean.test(); } }
该问题在构造器注入中无法解决,只能通过set注入解决,因为set注入是先将bean对象全部先实例化再调用setter方法的
静态工厂注入 与静态工厂实例化类似,通过静态工厂实例化另一个bean对象再返回出来作为字段,静态工厂方法
public class InjectFactory { public static TestBean2 injectTestBean2 () { return new TestBean2 (); } }
配置文件写法
<bean id="testBean" class="Beans.TestBean" /> <bean id="testBean2" class="Factory.InjectFactory" factory-method="injectTestBean2" />
类似的还有实例工厂注入,该方法与上文的实例方法实例化类似,同时也需要实现setter方法,配置文件如下
<bean id ="testBean" class ="Beans.TestBean" > <property name ="testBean2" ref ="testBean2" /> </bean > <bean id ="injectFactory" class ="Factory.InjectFactory" /> <bean id ="testBean2" factory-bean ="injectFactory" factory-method ="injectTestBean2" />
p名称空间 spring2.5以后,p名称空间被引入,该特性可以简化set注入的流程,将<property>标签简化为bean的一个属性,使用p名称空间需要引入xmlns:p="http://www.springframework.org/schema/p"
<bean id="testBean" class="Beans.TestBean" p:testBean2-ref="testBean2" /> <bean id="testBean2" class="Beans.TestBean2" />
自动装配(注入) 除了使用xml配置文件注入,还可以使用注解注入,这种方式能够简化注解流程,使程序更加简洁,Spring底层的注解注入主要通过反射实现
前提
引入命名空间
<beans xmlns ="http://www.springframework.org/schema/beans" xmlns:xsi ="http://www.w3.org/2001/XMLSchema-instance" xmlns:context ="http://www.springframework.org/schema/context" xsi:schemaLocation ="http://www.springframework.org/schema/beans https://www.springframework.org/schema/beans/spring-beans.xsd http://www.springframework.org/schema/context http://www.springframework.org/schema/context/spring-context.xsd " >
在配置文件中擦插入<content:annotation-config/>开启自动化注入
<context:annotation-config /> <bean id ="testBean" class ="Beans.TestBean" /> <bean id ="testBean2" class ="Beans.TestBean2" />
注解注入分@Resource和@Autowired两种
@Resource注解 该注解默认通过属性字段名称name查找对应的bean对象,如果字段不一样,则会通过class查找,该注解不需要实现setter方法,该注解可以声明在属性字段上或setter方法上(如果有的话)
@Resource注解可以设置name属性,但此时要跟id一致
public class TestBean { @Resource(name = "testBean2") public TestBean2 testBean2; public void setTestBean2 (TestBean2 testBean2) { this .testBean2 = testBean2; } public void test () { System.out.println("test" ); this .testBean2.test(); } }
注入接口时,若接口有两个及以上实现类,需要使用name属性指定需要的实现类对象
public class TestBean { @Resource(name = "testBean2") public Interface anInterface; public void test () { System.out.println("test" ); this .anInterface.test(); } }
@Autowired注解 该注解默认通过class查找,与字段名称无关,该注解不需要setter方法,该注解可以声明在属性字段上或setter方法上(如果有的话)
该注解不支持添加name属性,如果需要达到相似的效果需要配合@Qualifier的value属性使用,@Qualifier的value属性必须要设置且需与bean的id属性相同
public class TestBean { @Autowired @Qualifier(value = "testBean2") public Interface anInterface; public void test () { System.out.println("test" ); this .anInterface.test(); } }
扫描器 扫描器简化了配置文件添加<bean>标签的操作,扫描器的功能一样通过注解实现
前提
设置自动扫描范围,base-package后接包名表示扫描的范围,若对象不在扫描范围,即使添加注解也不会被实例化
<context:component-scan base-package ="Beans" >
使用特定的注解
注解
级别
@RepositoryDao层
@ServiceService层
@ControllerController层
@Component任意层
使用方法还是很简单的,这里用了@Component注解之后配置文件就完全不用管了
@Component public class TestBean { @Autowired @Qualifier(value = "testBean2") public Interface anInterface; public void test () { System.out.println("test" ); this .anInterface.test(); } }
Bean的作用域 对于bean的作用域主要有两种
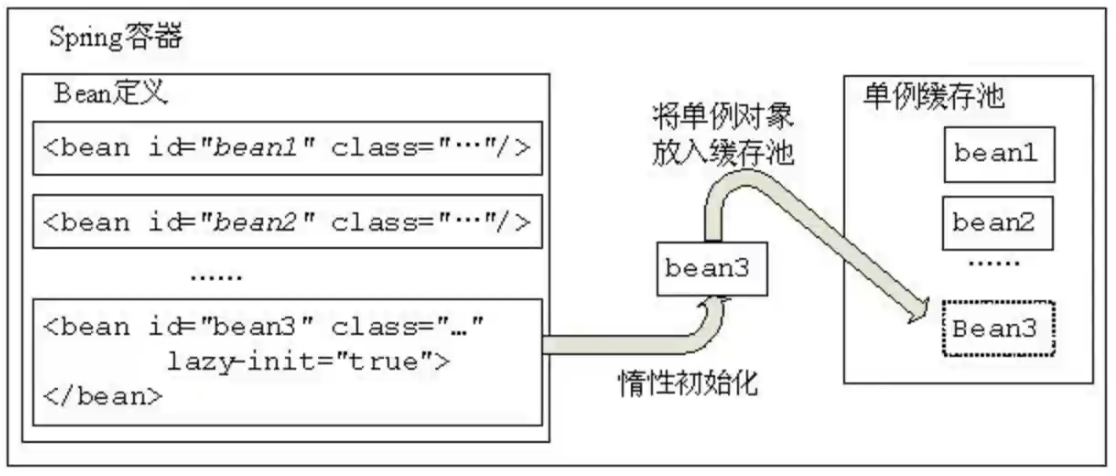
singleton作用域
lazy-init属性用于指定是否懒加载,懒加载在Spring启动时不会实例化该类,而在程序调用时实例化,默认情况下Spring会在启动时实例化类并缓存在容器中
么亲看下一个bean对象在IOC容器中只有一个实例,所有获取该bean的操作都返回同一个实例
什么对象适合作为单例?
无实例变量或保证实例变量全局统一的对象适合作为单例。因为单例对象在全局只有一个实例,若该单例存在实例变量,当该成员变量在某一处被修改时,会造成该单例的状态被全局修改,这不利于单例在全局的统一性。同时若该单例的实例变量被多线程修改,也会存在线程不安全问题
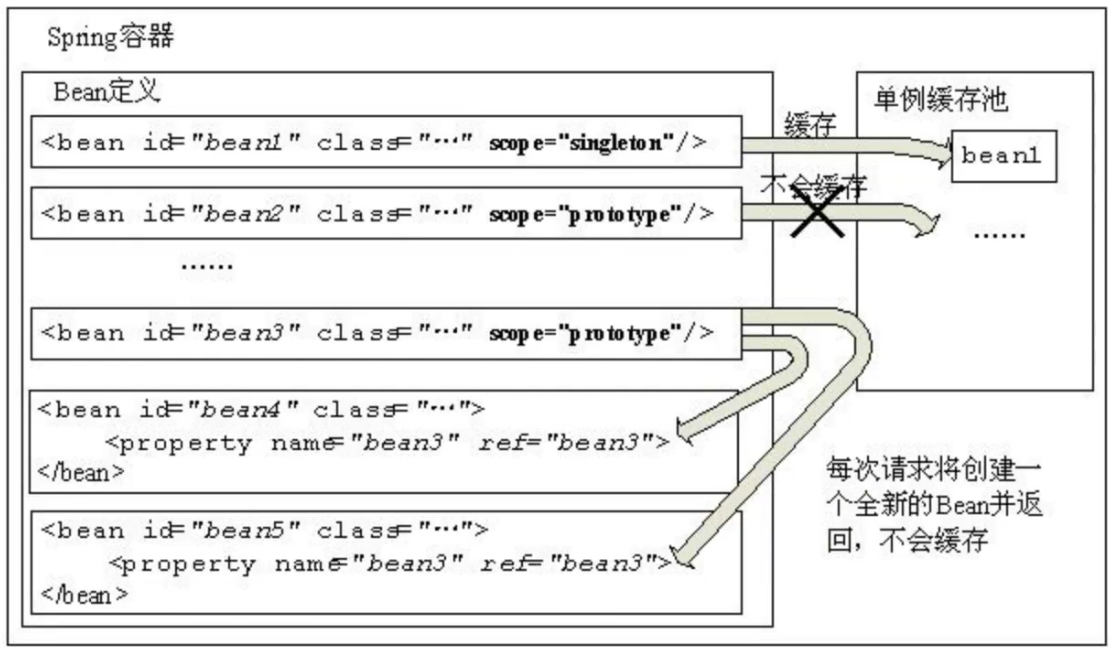
prototype 作用域
通过scope属性设置为prototype的bean类型,每次向Spring请求都会获得一个全新的bean对象,Spring在启动时不会先实例化到缓存池,此方式获得的bean全局不唯一
Web应用中的作用域 request作用域
表示每个请求需要容器创建一个全新Bean。比如提交表单的数据必须是对每次请求新建一个Bean来保持这些表单数据,请求结束释放这些数据
session作用域
表示每个会话需要容器创建一个全新Bean。比如对于每个用户一般会有一个会话,该用户的用户信息需要存储到会话中,此时可以将该Bean作用域配置为session级别
globalSession作用域
类似于session作用域,其用于portlet(Portlet是基于Java的Web组件,由Portlet容器管理,并由容器处理请求,生产动态内容环境的web)应用。如果在非portlet环境将视为session作用域
Bean的生命周期 bean的生命周期包含定义、初始化、使用和销毁四个阶段
bean的定义 定义bean的过程就是通过配置文档定义bean类型的过程
bean的初始化 bean的初始化可通过两种方法进行
在配置文档中指定init-method进行
为bean创建一个初始化方法
public class TestBean { public void init () { System.out.println("init..." ); } }
配置文件中指定init-method属性
<bean id ="testBean" class ="Bean.Test" init-method ="init" />
实现InitializingBean接口
public class TestBean implements InitializingBean { @Override public void afterPropertiesSet () throws Exception { System.out.println("init..." ); } }
配置文件不需要init-method属性
<bean id ="testBean" class ="Bean.Test" />
bean的使用 bean可以通过BeanFactory获得
BeanFactory beanFactory = new ClassPathXmlApplicationContext ("spring.xml" );TestBean testBean = (TestBean) beanFactory.getBean("testBean" );
或者通过ApplicationContext
ApplicationContext context = new ClassPathXmlApplicationContext ("spring.xml" );TestBean testBean = (TestBean) context.getBean("testBean" );
二者没有本质区别,因为ApplicationContext实现了ListableBeanFactory接口,而ListableBeanFactory是BeanFactory的子接口
bean的销毁 为bean对象创建销毁方法
public class TestBean { public void destroy () throws Exception { System.out.println("destroy..." ); } }
指定销毁方法
<bean id ="testBean" class ="Bean.Test" destroy-method ="destroy" > </bean >
调用AbstractApplicationContext的close()方法
AbstractApplicationContext applicationContext=new ClassPathXm1ApplicationContext ("spring.xml" ); applicationContext.close();
程序会打印destroy...